One thing you’ll notice when working with MS Project is that the software supports two ways of scheduling tasks: Manual scheduling and automatic scheduling.
You should understand the difference between the two, so that you are able to plan your project properly.
In this article we’ll look at what’s the difference and I’ll tell you when to use each.
(New to MS Project? Check out my e-book, The 80/20 Guide to Microsoft Project)
What is meant by scheduling?
Scheduling is the process of allocating tasks on the timeline. Let’s say you have a task that starts on Wednesday, January 1st and takes 5 days to complete. Then the task will end on Tuesday, January 7th, because you don’t work on Saturday and Sunday. This is scheduling in the simplest form.
In real life, scheduling project work is a lot more complex.
Suppose a task takes 10 days to complete and you start on Thursday, September 3rd. On Friday, September 4th you are on a business trip where you can’t work on the task. Also, there’s a national holiday on September 7th (Labor Day), so no work on that day either. On Monday, September 14th there’s an afternoon team event. That’s another half day away from your project.
Result: a task which could have been finished on the 16th of September now stretches till September 18 noon time.
Keep in mind that this is still a simple example. Bigger projects are so complex to schedule because you have to factor in a ton of constraints like resource limitations, holidays, corporate events and the like.
Manual scheduling
Manual scheduling in MS Project means you are free to set the start dates of the individual project tasks. MS Project doesn’t automatically schedule tasks based on the defined project start date and the duration of each task. This gives you the flexibility to schedule each task at the date you want it to start.
By default, MS Project uses manual scheduling.

The price for greater flexibility is additional work. Because when you’re using the manual scheduling mode you have to schedule every task manually (duh!). This takes a lot of time when your project has hundreds of tasks. And if you make a mistake, it might be that your schedule is wrong.
Example manual scheduling:
The official project start date is Thursday, January 2nd. The first task in the project is to set up project budget which takes 10 business days to complete. So, the task would be finished by January 15 (there are two weekends in between). Maybe you decide you don’t want to start working right on the 2nd of January, but rather have a fresh start on Monday 6th of January. So you just manually schedule the task set up budget with start date January 6th.
Automatic scheduling
Automatic scheduling takes care of the entire scheduling for you. Instead of you having to schedule every task one by one, MS Project plans out the entire project from start to finish. Scheduling is done based on the following data:
- the project start date
- the duration of each task
- the dependencies between tasks (the order of tasks)
- any other constraints (like national holidays)
In other words: All you have to do is tell MS Project when your project is going to start, what tasks have to be done and how long each task is going to take (there’s also a way to have variable durations in Microsoft Project). Also, you have to link up tasks with each other so that MS Project knows in what order tasks must be scheduled.
The fourth factor that determines your project schedule are calendar constraints and other restrictions. This is a really cool feature of MS Project which ensures projects are perfectly aligned with other events on the calendar, like public holidays or corporate events where nobody is in the office.
Example of automatic scheduling:
Project start date: February 3rd 2020
Task 1: Paint interior (5 days of work)
Task 2: Paint drying phase (2 days)
Task 3: Furnish rooms (4 days of work)
All three tasks must be carried out in the given sequence. We can’t furnish the rooms before the interior has been painted. And there’s no point in waiting for the paint to dry before we’ve painted the walls. So, we tell MS Project that task #1 must come before task #2, and task #2 must come before task #3.
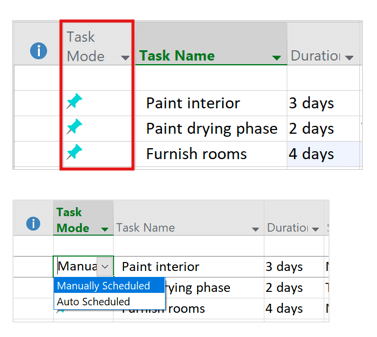
Now MS Project can automatically schedule these three tasks in the desired sequence. Here’s what the Gantt chart and task list look like:

As you can see from the screenshot, the paint drying phase starts right after painting has been completed. This is how auto scheduling works. MS Project automatically arranges each task next to each other and make sure the project doesn’t take longer than required.
Manual vs. automatic scheduling — the difference
The difference between manual and automatic scheduling is that in manual scheduling you must schedule each task individually, whereas automatic scheduling does the entire scheduling for you, taking into consideration the project start date, the duration of tasks, the dependencies of tasks as well as other constraining factors (like calendar events or bank holidays).
The manual scheduling also means more work, because you are responsible for scheduling all tasks.
Here’s how you can change the task mode on task level:

Which scheduling strategy should you use?
 If you are new to MS Project, try first to understand how manual scheduling works. Experiment with different tasks and arranging them in the desired sequence.
Once you start planning your first real project, use automatic scheduling. The scheduling mechanism of MS Project is the actual reason why MS Project is so powerful — it does the whole scheduling for you, no matter how big your project is!
Did you find this article helpful?
Your feedback means a lot to me, because it helps me figure out what kind of content you want to read. If you liked this article (or if you have questions), post a comment below.
Author
-
Hi, I’m Adrian, a Senior Project Manager and the Creator of Tactical Project Manager, where I teach a pragmatic approach to project management. Led large-scale IT and business projects for over 10 years. My goal is to enable you to lead any project with confidence.
View all posts


